Wednesday, December 3, 2014

Happy December!

I knew December was coming, it comes every year....but will I be ready for Christmas?

As a crafter, I love to create and share my projects as gifts but I must confess, I do not like to wrap presents.  Gift bags are wonderful and easy to use so if the gift will fit, in it goes!

Not all of the gifts I give are handmade, I do like to support local businesses.   there are people who do not appreciate the work that goes into creating something special.  After hours of making scarves (for example) I have been told by the gift recipient, "oh it's nice but I would have liked one longer to wrap around my neck twice". (Yes, I did start making that style also but other folks like the single wrap just fine).  What happened along the years that made people unappreciative of a gift given from the heart?

OR someone will ask me to knit a cowl or scarf and just want to spend $10....ok, if I can get the yarn for less than $1 that might be possible but really???  I do not charge an arm and a leg for my crafting projects and in fact I make many of them as special gifts but I do understand how other crafters share in the frustration regarding getting paid fairly for the number of hours they have devoted to making a special piece.

On one painting group on Facebook there was a chart of how to price your items.  I was excited but realize that in this small market area people still won't want to pay that.  "Don't under-price", I have been told...ok, but if I price it fairly not many people want to purchase for that kind of price.

I do not know what the answer is but I can safely say that since I enjoy what I do I will continue to do it.  I am expanding with more furniture projects (I have a table in the garage that I got from an estate sale and it is calling me to come and work on it but I have to wait til after Christmas.I am itching to use some more General Finishes paint and topcoat!)

So if you craft and enjoy it, be sure to continue with your passion. While not everyone will appreciate the time, effort and cost you have put into each project, you will know that it has been made with your heart and soul and that spreading the joy can be worth it (even if your wallet doesn't earn back that same joy).

*****

In an earlier blog post I showed a white acrylic toddler cowl that I made.  
Here is the recipient Little Miss A. wearing it ...

I hope she keeps toasty warm!

*****


That's it for now. I am making a special Christmas plaque so need to get going.

You can find me on Pinterest:


or by email at penandinkwell@yahoo.com  

or visit me on Facebook

https://www.facebook.com/pages/Handcrafted-Projects-by-Sue-Lane/105487656209042?ref=hl


Thanks for reading! I'll be back soon!


Friday, November 28, 2014

Santa Claus is coming to town!

Tonight is our small town's Santa Claus parade. It is always a fun event and the Christmas lights on the floats and vehicles twinkle in the dark sky. We have just enough snow to make it festive...if you were to rewind the calendar to last week, we would have had too much snow!  I am trying to keep busy with the projects since December is right around the corner.

I am pleased to share some of my latest work.

I bought a wooden file cabinet (in need of a bit of TLC) from an estate sale and wanted to do something completely new and unexpected. I have been chalk painting but didn't want to do that this time around.  Just in time I received my package from General Finishes that included two colors of their milk paint and a can of High Performance Topcoat in a flat finish.  Of course I had to open the paint right away (it was like an early Christmas present!)

As the cabinet had been in not so great shape I first had to wash it.  (Because you just never know what's in there when it's been sitting and unused for a while.  . After it had dried I gave it a light sanding with a medium grit sandpaper. Yes, I took the drawers out to do this....   

Now the fun begins!

Woohoo - I opened the can of Linen color milk paint and loved it....but was it going to be a nice paint to work with?  Oh yes it was! It went on so smooth and didn't drag like some other paints I have used. (Not sure if drag would be the technical term but the brush just flowed like it was skating on ice.)
I did two coats of the paint, it really covered well and I could have gotten away with one coat but I think I am so used to doing at least two coats I was stuck in that rut.

Anyhow, after the paint had dried, I did rough measurements for line placement but wasn't too concerned that they be an exact distance from one another. This is a fun plaid and I wanted it to be unstructured.  After the markings were in place I drew a bunch (that is a technical term!) of ideas for plaids using colored pencils. I always like navy and red-burgundy together so those were my starting points.


I used flat artist brushes to do the lines....I got a rhythm going so that I could make the plaid come together in a way that I liked.  It is a lot of tedious work but I was glad I took my time because where the lines intersect  you are able to see that they do.


After a few days of painting lines, it came together the way I envisioned.  For the topcoat I decided to use the flat finish High Performance Topcoat that I got from General Finishes.  I used a plastic spoon to stir it and then used the spoon to put it into a separate container (so that I didn't somehow contaminate the topcoat in the can in case any paint transferred to the brush).  I used about 20 teaspoons per coat of the topcoat. You sure don't need a lot of this to get good coverage.  I did two coats and am so happy with the results.

A shout out to General Finishes https://generalfinishes.com  This is my first experience using their products (and actually my first experience with milk paint!)  I am more than happy with the quality and ease of application.  Guess what is on my list to Santa now???

*****


You know that I use a styrofoam head sometimes but it lacks a real neck so sometimes I will hang a scarf on a hanger with a shirt/sweater as the background but this time I used a real model.   She is a but shy so I cut her head off...don't worry, only for the picture!

This is a double strand acrylic yarn wrap scarf.  I did a nice ribbing detail (my own design) and knit for days and days til I finished it. (Ok, I knew it would take a while so I am not really complaining).  It is secured with four wooden buttons and I made yarn loops to put around the buttons.  It is really toasty warm to wear.

*****

That's it for now, I have more projects on the go and also some of the ones I have recently completed can't be posted on-line until after Christmas as they are for gifts.

You can email me at penandinkwell@yahoo.com or 

find me on Facebook at Handcrafted Projects by Sue Lane  
https://www.facebook.com/pages/Handcrafted-Projects-by-Sue-Lane/105487656209042?ref=hl


I am also on Pinterest so follow me! I will add my new projectst to the  "My Creations" board soon.  http://www.pinterest.com/sue_montgomery/


Thanks for looking!


Friday, November 21, 2014

Another snow day!

It has been the perfect time to stay indoors and craft. Lots of snow outside and it's pretty chilly.  So here are my latest creations!


I love to paint mason jars with chalk paint!  These are done in blue and then dry brushed over top with white to bring out the details.  I gave them two coats of wax and finished off with sisal twine.


4" x 6" canvas magnet.  Base coated with acrylic in navy, floated white around the edges. Lettered in a bluish-white acrylic paint and topped with two coats of varnish. The magnets are on the back.


A toddler-sized cowl.  Knitted with gray and white strands together on circular needles.  Acrylic yarn.


White acrylic toddler-sized cowl made by request for a special little girl.  Knitted on circular needles. I will get a photo of the little one modelling this soon.


Using three strands of acrylic yarn (gray, light teal and white) I knitted this long double loop infinity. Nice and warm!


Another one of my original sayings (c. 2014) on a 4" x 6" flat canvas. Acrylic base coat, floated white around the edges.  Finished with varnish and put magnets on the back.


That is about it for now, more projects on the go including my bathroom re-do.  I will be posting more after I complete the current pieces.

You can reach me at:


and I am active on Pinterest - follow me at:

Thanks for looking!

Sunday, November 16, 2014

November projects!

It is hard to believe it is November already!  I am making gifts for family and friends.  Here are a few pictures....

These are quart Mason jars. I painted them Deco chalky finish paint in "relic".  After drying, I used a dark sanding block to sand back over the lettering and raised portions of the jar.  After a wipe down, I waxed with Deco creamy wax,


This one of the multi-color scarves I knitted (shown in previous blog post) 
and modeled by the recipient. 


On the left is a close-up of the stitch pattern I designed and the finished project is on the right. It is a nice lightweight lacy acrylic infinity scarf, made long enough to wrap around the neck twice.


I can be reached at penandinkwell@yahoo.com  if you have any questions
 or would like me to make you something special!


I can be found on Pinterest at: 


Thank you for looking at my projects!

Tuesday, October 28, 2014

The clacking of knitting needles continues!

I made my nephew and his wife a soft, cuddly blanket for their baby-to-be.  They are expecting a little girl, it is exciting for the family and their son will enjoy being a big brother!

Here is the blanket keeping the baby toasty warm now...she is due to make her arrival at the beginning of December.


*****

Here are two scarves I made that will keep the wearer protected from the cold 
and be fashionable at the same time!

This was done with one strand of multi-color yarn and a strand of blue.  I did my own stitch repeat and it falls quite nicely.  The length is long enough for a double loop  infinity scarf

This double loop infinity features one strand of purple and one of cream.
 It is also destined to be toasty warm.


Thanks for looking today.

I can be contacted at penandinkwell@yahoo.com 

and am also on Pinterest!


Monday, October 27, 2014

I have been having a great time with chalk paint.  While I have made my own batches with plaster of paris in the past, I am now using brand name paint to see which ones I like the best.  For these projects I have been using Deco Americana Chalky Finish paint and creamy wax.


 My second bucket...base coated with yellow chalk paint, top coated with green and then sanded a bit off of it. I put a couple of coats of wax on it for protection.


I lacquered the label of this coffee jar to make it water resistant. There is a hole in the top - I inserted a pump into it. Voila - soap dispenser for the kitchen! 


Set of two canning jars....for decorative purposes....chalk painted a light blue then sanded a bit to distress them. Wax top coat for protection. Not to be immersed in water.


Set of two canning jars...painted a pinkish color in chalk paint, sanded to distress; followed with some ivory chalk paint dry brushed on and then waxed. Raffia ties accent the jars. Not to be immersed in water.
 These are for decorative purposes only.

Large canning jar...painted with blue chalk paint and lightly distressed. Top coated with wax and accented with raffia. Not to be immersed in water. This is for decorative purposes only.


Vintage loaf pan painted with blue chalk paint. Coordinates with large jar and also the small blue jars. Top coated with wax. Not to be immersed in water. This is for decorative purposes only.


I will continue to share more projects soon!

Thank you for looking.

You can reach me by email at penandinkwell@yahoo.com 

 and I am also on Pinterest!


Thursday, October 23, 2014

Busy Hands for October

I continue to work on projects, some of them can't be posted on-line until after Christmas as they are gifts...it's that time of year to get your gift list together.  

So here are is just a small sample of what I have been doing! 


This is a plaque for a new baby girl. I stained the wood then painted the lettering with acrylic paint. I painted the edges and then floated pink around it.  For protection I used Deco Americana soft wax. I have been using it on some furniture and thought I would see how it worked on a plaque.....
it worked nicely!


This scarf is made using double strands of multi-colored yarn in green, blue and white.
 It is about 58" long and I finished it off with fringe.


These two canvas signs are for brothers-in-law for Christmas.  Acrylic paint on canvas board, sanded back the paint a bit to make it look a bit rougher.  Top coated with varnish.  I drilled holes and inserted wire to hang.


Before and After

I found a couple of wooden buckets at a thrift store and painted them with Deco Americana paint, sanded the paint back a bit and then waxed it with the cream wax.  Raffia on the handle tops it off.


A marriage keepsake canvas board....black acrylic paint, lettered with gray Krylon enamel. 
 I floated gray around the edges.  
Not shown in this photo - I drilled holes and inserted black ribbon for hanging.


That's it for now, I will be making more projects and am excited to be receiving some 
General Finishes products that I will try out on a large piece.


Please contact me at penandinkwell@yahoo.com


You can also visit me on Pinterest and see all the fun pins!


Thursday, October 2, 2014

Playing with more paint

I've been busy with more projects so take a look!

In previous blog posts I have shown pictures of chalk painted tables and a bookcase. I also posted the re-do of the old settee that has a new life.

These are my latest projects and I am in the process of working on some wooden buckets now and will finish those in the next few days. Come back soon to take a peek!


This night table started out with a shiny lacquer-type finish. To transform this, I mixed up my own batch of chalk paint using some latex semi-gloss paint (that I used in my kitchen.) This taupe color already made a big difference. For the drawer I used Deco Americana Relic chalky paint. Since I have seen others use chalk paint for metal handles, I tried that, too.  Using the same taupe, it covered well.  To complete the transformation I waxed the whole piece using the Americana creme wax. 


Project number two this week started out as a mystery piece. This wooden 'thing' has a spring loaded sliding wood piece. A few of us could not figure out what it was. My hubby to the rescue- he figured out it would hold a decorator plate! 


This is the completed piece with an Americana themed plate.  I painted the wooden piece with Americana Relic chalky paint. Once it dried, I sanded back a bit to distress it. I sealed it with the Americana creme wax.


This is one of my fun projects.  I made some chalk paint with plaster of Paris.  I painted the whole table the light blue. I then came back with red, white and blue to make the flag. Stencilled stars complete the look. From there I went a bit rough with the sandpaper to give it a chippy look. It's for my Americana themed family room.


This vanity started out white but lacked personality.  I removed all the knobs and doors and painted the vanity with BeautiTone Exterior paint from Home Hardware. No other top coat used, this exterior paint holds up well in the bathroom.

That's about it for now, thanks for looking! I am getting excited to do more projects, will be painting up a storm and also continuing with my knitting.  Christmas will soon be here!

If you have any questions or would like me to complete a project for you, contact me at penandinkwell@yahoo.com

I can also be found on Pinterest!


Friday, September 19, 2014

Fall is already in the air...perfect knitting weather!

I've been busy creating so here are some of my newest projects!


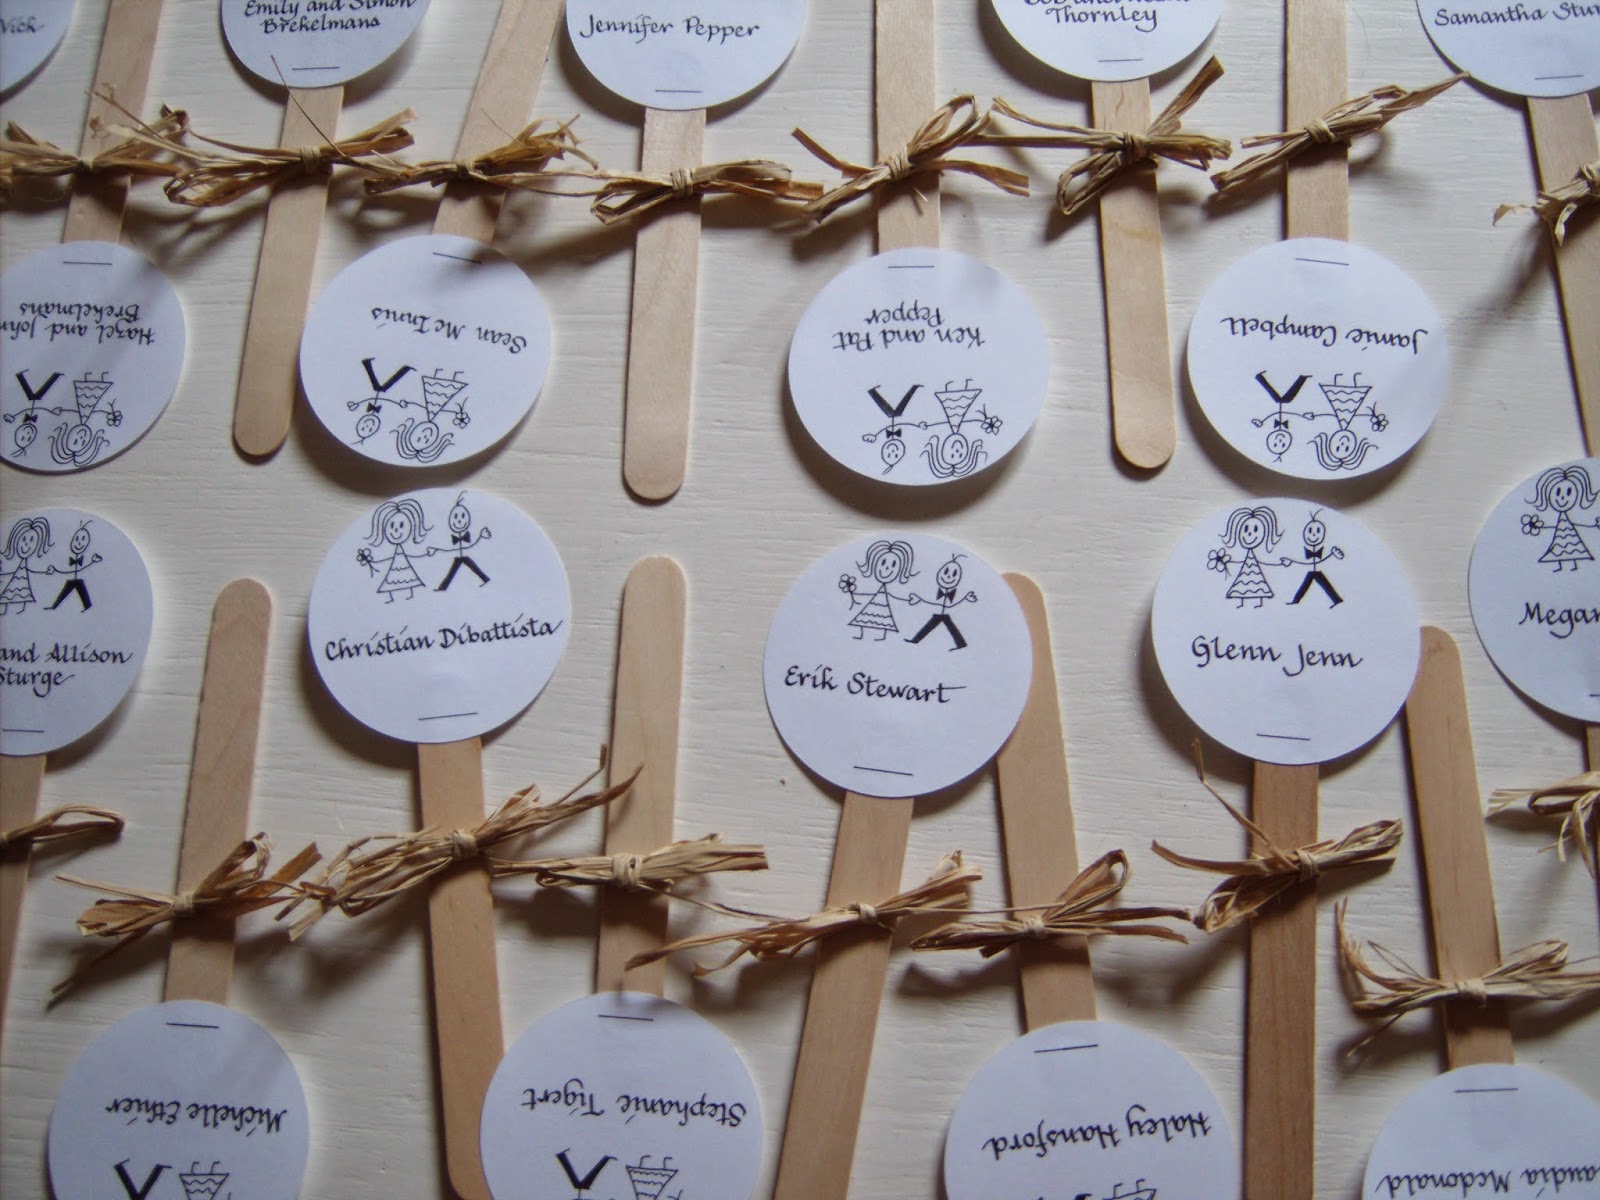
This is a sign for a wedding - the placecard sticks will go into caramel apples so the people can take a treat (the apple) and find their seat (with the numbered placecard.) The placecards are made of cardstock disks that I cut on the Cricut machine, I added the guests' names in calligraphy. The little couple on top is a design I created for the theme of invitations, etc. and I did each one individually. The disk is then glued onto the stick and raffia added. There is a space for the table number.


This will sit flat on the entrance table. It is a reclaimed frame, painted flat black and dry brushed. With a foam core backing, I then put black bristol board for a background and then white bristol board on top of that. The guests will sign the white board. I lettered it with black ink and added a raffia bow.


This before and after is an old settee.  I stripped off all of the fabric to begin with. My husband cut new wood pieces for inserts and the seat. I painted it gray and then dark waxed it to bring out the details. The trim (hard to see it) is black along the bottom of the new cushion. I got vintage fabric at a thrift store and washed it then used it for the cushion cover.


This is a long infinity scarf knitted with two colors of yarn on large needles.
 I then stitched the ends together.  It's toasty warm.


This is a yellow knitted infinity scarf, I was fooling around designing a stitch repeat that I liked - knit and purl stitches.


A toddler cowl - pink acrylic yarn.  Safer for the little one to wear than a dangling scarf.


Extra long baby yarn scarf. Knitted and added fringe.  Super soft!


That's about it for now. I will be adding more projects as I complete them. 

I can be found on Pinterest at:


If you would like me to make a project for you, just ask!  I can be reached by email at:


Thanks for looking at my projects!